Installation
To install and run SSIS Integration Toolkit for Microsoft Dynamics CRM, your system must have the following components installed.
- A supported SSIS design-time or run-time, which can be one of the following:
- SSIS 2016
- SSIS 2014
- SSIS 2012
- SSIS 2008 R2
- SSIS 2008
- SSIS 2005
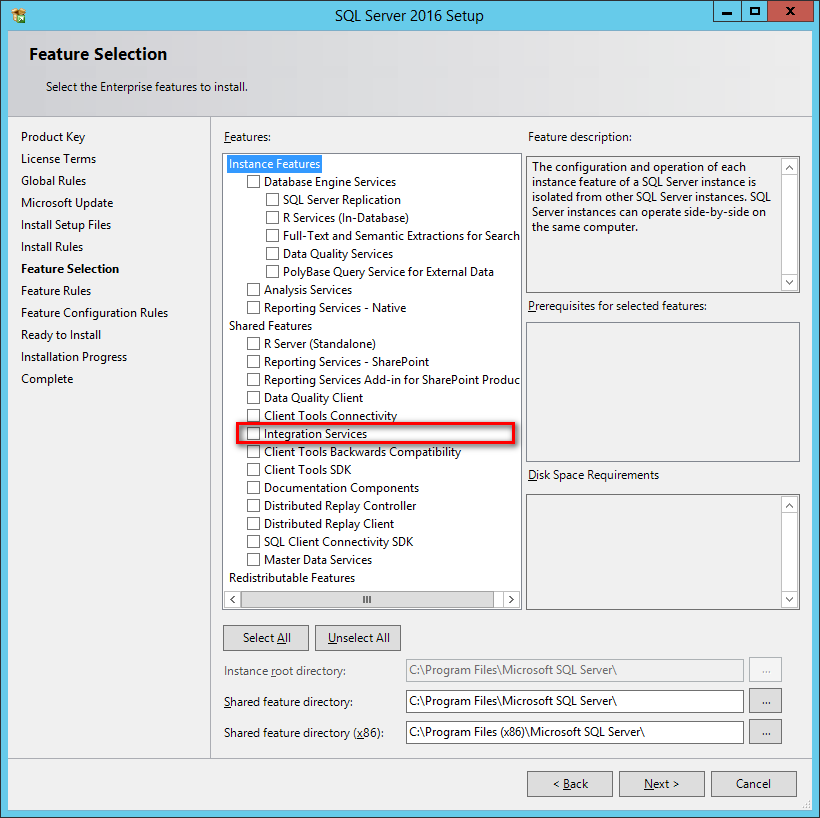
For SSIS runtime, the installation should be done by using the corresponding SQL Server installation media (most likely in CD/DVD format), and you must select the "Integration Services" component during the installation (as shown below).
Note that for SSIS runtime, SQL Server Standard Edition or above is required to run our software. SQL Server Express or Web editions are not supported due to their own limitations.
The SSIS Integration for Microsoft Dynamics CRM Setup Wizard will appear. Click ‘Next’ to continue.

Select the checkbox to agree to the terms of the End-User License Agreement. Click 'Next' to continue.

Next, choose one of the three setup types that best suits your needs.

Click ‘Install’ to begin the installation.

To complete the installation, select 'Finish'.

Setup a CRM Connection using CRM Connection Manager
SSIS Integration Toolkit CRM Connection Manager is an SSIS connection manager that can be used to establish connections with the Microsoft Dynamics CRM Server.
The CRM connection manager allows you to specify how you want to connect to your CRM server.
To add a CRM connection to your SSIS package, right-click in Connection Manager area, and choose "New Connection..." from the context menu. You will be prompted the "Add SSIS Connection Manager" window where you can add the "DynamicsCRM" item.


The CRM Connection Manager contains the following three pages which configures how you want to connect to the Microsoft Dynamics CRM server.
- CRM Server
- Advanced Settings
- More Info
CRM Server page
The CRM Server page of the CRM Connection Manager allows you to specify general settings for the connection.

- Authentication Type
- The Authentication Type option allows you to specify the deployment type of your CRM server and what authentication is used. There are four options available.
- Active Directory (On-Premise)
- Federation (IFD, On-Premise or Partner-hosted)
- Online Federation (Office 365 CRM Online)
- LiveId (Legacy CRM Online)
Note that Online Federation option is only available since v5.2 release. If you use any prior versions, you should choose Federatedoption when working with an Office 365 (OSDP) CRM Online instance. - CRM Discovery Server
- The CRM Discovery Server option allows you to specify the CRM discovery server URL which you can use to discover your CRM organizations and their web service URLs. The CRM discovery server can be found in the CRM system from Settings |Customizations | Developer Resources after you have logged in to your CRM application.Please ensure to enter the full URL of your CRM discovery server, the path after the server name is not needed.For instance, the following is a sample list of CRM discovery servers that you can enter in the CRM connection manager if you are using CRM online or Office 365 (The list below is for reference only, and it may not represent the most updated information).
Location Office 365 CRM Online
Discovery Server URLLegacy CRM Online
Discovery Server URL (Live ID)North America https://disco.crm.dynamics.com/ https://dev.crm.dynamics.com/ EMEA https://disco.crm4.dynamics.com/ https://dev.crm4.dynamics.com/ APAC https://disco.crm5.dynamics.com/ https://dev.crm5.dynamics.com/ South America https://disco.crm2.dynamics.com/ https://dev.crm2.dynamics.com/ Note that since v5.2, we offer a drop-down list which allows you to pick the URL from the list based on your region, so you no longer need to type in the above URLs.Similarly, for On-Premise or IFD deployments, the URL should typically be in one of the following formats, depending on your CRM server's setup.- http://CrmServerName/
- https://CrmServerName/
- http://CrmServerName:PortNumber/
- https://CrmServerName:PortNumber/
- Service Endpoint
- The Service Endpoint option allows you to specify the service endpoint that you want to use in order to connect to the Microsoft Dynamics CRM server. We currently support the following options:
- SOAP 2011 (CRM 2016, 2015, 2013, 2011)
- SOAP 2007 (CRM 4.0 and CRM 2011 On-premise)
- SOAP 2006 (CRM 3.0)
Depending on the version of your CRM server, you can choose different service endpoints. For CRM 2011 On-Premise Server, you can use either the SOAP 2011 endpoint or the SOAP 2007 endpoint. The SOAP 2011 endpoint is generally recommended as we have better support for activity party (partylist) fields. SOAP 2011 is also the latest service interface, which is considered to have a better upgrade path in the future. - SDK Client Version (deprecated since v6.0)
- The SDK Client Version option allows you to specify the SDK version that you use to talk to the CRM Server. This option is only available when the SOAP 2011 service endpoint is used. Currently there is only one option available.
- 6.0
The option is only necessary (when available) if you need to work with entityimage field, which is a new feature introduced since CRM 2013. Since our v6.0 release of the toolkit, we always send in a SDK Client Version in order to work with the latest CRM metadata. - Use Integrated Authentication
- This option is only available if you have chosen "Active Directory (On-Premise)" as Authentication Type. Using this option, you have the flexibility of not saving your login credential in the SSIS package, which might help simplify the deployment process of your SSIS packages.
- User Name
- The User Name option allows you to specify the user account that you want to use when connecting to your CRM server. Depending on how the CRM connection is used, the user account needs to have proper privileges in your CRM system .
- Password
- The Password option allows you to specify the password for the above user account in order to login to your CRM server.NOTE: The Password is not included in the CRM connection manager's ConnectionString property by default. This is done by design for security reasons. However, you can include it in your ConnectionString if you want to parameterize your connection manager. The format would be Password=myPassword; (make sure you have a semicolon as the last character). It can be anywhere in the ConnectionString.
- Domain
- The Domain option is used to specify the active directory domain of the CRM user account. This option is only available when the Authentication Type is "Active Directory (On-Premise)".
- Organization
- After the CRM server location and login credentials have been provided, you can click the drop down button of the Organizationoption to show a list of available organizations that the user has access to. Select the organization that is intended to be used.
- Test Connection
- After all the connection information has been provided, you may click the "Test Connection" button to test if the user can successfully login to the CRM server.If you happen to run into the following error message when testing the connection, it is most likely that the provided CRM organization does not exist in the target CRM server.Metadata contains a reference that cannot be resolved: 'http://xrmsvr/CrmOrganizationName/XRMServices/2011/Organization.svc?wsdl'. (System.ServiceModel)
ADDITIONAL INFORMATION:
The remote server returned an error: (404) Not Found. (System)

Advanced Settings page
The Advanced Settings page of CRM Connection Manager allows you to specify some advanced settings of the connection.

- Proxy Server
- Using the Proxy Server option, you can provide a proxy server to connect to the CRM server.
- Port
- The Port option allows you to specify port number of the proxy server for the connection.
- Username (Proxy Server Authentication)
- The Username option (under Proxy Server Authentication) allows you to specify the proxy user account.
- Password (Proxy Server Authentication)
- The Password option (under Proxy Server Authentication) allows you to specify the proxy user's password.NOTE: Proxy Password is not included in the CRM connection manager's ConnectionString property by default. This is done by design for security reasons. However you can include it in your ConnectionString if you want to parameterize your connection manager. The format would be ProxyPassword=myProxyPassword; (make sure you have a semicolon as the last character). It can be anywhere in the ConnectionString.
- Timeout (secs)
- The Timeout (secs) option allows you to specify a timeout value in seconds for the connection. The default value is 60 seconds.
- CRM Server URL (since v5.1)
- The CRM Server URL is the actual URL that is utilized by the connection manager to make service calls to CRM. This field should be prepopulated for you. In special cases where you want to specify the CRM Server URL, you can change the value by first unlocking the field using the lock/unlock button next to it.
- Home Realm Uri (since v4.1)
- Specify the URI of the cross realm STS metadata endpoint. It should typically be a URL starting with https. This option is usually optional, and it may be required for certain deployment. In the case that this option is required, it should typically be in the following format.
- Retry on Intermittent Errors (since v5.1)
- This is an option designed to help recover from possible intermittent outages or disruption of service so the integration does not have to be stopped because of such temporary issues. Enabling this option will allow service calls to be retried upon certain types of failure. A service call may be retried up to 3 times before an exception is fired. Retries occur after 0 seconds, 15 seconds, and 60 seconds.Warning: Although we have carefully designed this feature so that such retries should only happen when it is deemed to be safe to do so. However, in some extreme occasions, such retried service calls could result in the creation of duplicate data.Note that between v3.0 and v5.0 SR-1 (inclusive), the retry implementation was enabled by default, and there is no option to turn it off until v5.1 release.
- Ignore Certificate Errors (since v7.2)
- This option can be used to ignore those SSL certifcate errors when connecting to CRM server.Warning: Enabling "Ignore Certificate Errors" option is generally NOT recommended, particularly for production instance. Unless there is a strong reason to believe the connection is secure - such as the network communication is only happening in an internal infrastructure, this option should be unchecked for best security.Note: When this option is enabled, it applies to all HTTP-based SSL connections in the same job process, it is not just limited to Dynamics CRM connections.
More Info page
The More Info page contains basic information about the toolkit. In this page, you can find the version information of the toolkit.

Add CRM Components to SSIS Toolbox
SSIS Integration Toolkit for Microsoft Dynamics CRM includes three data flow components. They must be shown in SSIS toolbox before you can use (drag and drop) them in SSIS data flow task.
- If you are using SQL Server 2008 R2 or earlier, you must add them to SSIS toolbox by following the instructions below.
- If you are using SQL Server 2012 or later, you should not need to do so, as SQL Server 2012 (or a later version) automatically lists all available pipeline components by scanning the system. Under certain circumstances, your SSIS toolbox might appear empty, in which case, you should click the SSIS Toolbox button (shown below) on the top-right corner of your Control Flow or Data Flow view.

Add CRM Data Flow Components to SSIS Toolbox (SQL Server 2008 R2 or earlier)
In BIDS 2008 or 2005 (depending on which SQL Server version you are using), create a new data flow task if you do not have one yet, and switch to the SSIS data flow page. Right-click on the toolbox area to bring up the context menu and select the "Choose Items..." option as shown below.

A window called "Choose Toolbox Items" will appear. Switch to "SSIS Data Flow Items" tab, and select Dynamics CRM Destination,Dynamics CRM OptionSet Mapping, and Dynamics CRM Source components from the list.

The three data flow components will now appear in your SSIS Toolbox. You can drag and drop any of them to the design surface of your SSIS data flow task.
Use of CRM Source Component
The CRM Source Component is an SSIS data flow pipeline component that can be used to read / retrieve data from the Microsoft Dynamics CRM server. The CRM source component supports using a CRM entity, or a FetchXML query as the data source.
The CRM Source Component includes the following two pages to configure how you want to read data from Microsoft Dynamics CRM.
- General
- Columns
The General page allows you to specify the general settings of the CRM source component, while the Columns page shows you all available columns from the entity or FetchXML query.
Since v3.0 release, we have added a retry mechanism to the CRM source component, so if an error is encountered when querying the CRM system, the component will make two retries using the same query before giving up. Each retry will be logged as a SSIS warning message.
General page
The General page of the CRM Source Component allows you to specify the general settings of the component.

- CRM Connection Manager
- The CRM source component requires a CRM connection in order to connect with the Microsoft Dynamics CRM server. The CRM Connection Manager option will show all DynamicsCRM connection managers that have been created in the current SSIS package.
- Batch Size
- The Batch Size option allows you to specify how many records you want to retrieve each time. The default value is 2000. The maximum allowed value is 5000. For performance reasons, this parameter should not be too small.
- Source Type
- The Source Type option allows you to specify whether you want to read data from a CRM entity, use a snippet of FetchXML query, or use the EntityChanges option. Using the Entity option, you have the flexibility of visually picking which fields you want to read from CRM entity. When FetchXML query is used, you can take advantage of the power and flexibility of CRM FetchXML query, such as JOIN, filtering criteria, etc. Your business requirements should influence which option to choose. The EntityChanges option allows you to make use of the 'Change Tracking' feature in CRM 2015 Update 1 or later to track transactional data changes for CRM entities. The AuditLogs option allows you to retrieve CRM audits and audit details for the entity specified.
- Source Type - Entity
- The Source Entity option is only available after the Source Type option has been chosen as Entity. When the option is selected, the SSIS Integration Toolkit will retrieve a list of all available CRM entities for the selected CRM connection. Please note that the list will only include the entities where the specified user in the CRM connection manager has read privileges.
- Source Type - FetchXML
- When you select FetchXML from the above Source Type option, you will be presented a text editor that allows you to enter a snippet of FetchXML query, which is used to retrieve data from the Microsoft Dynamics CRM server.
- One of the main advantages of the FetchXML option over the Entity option is that you can use FetchXML to build complex queries that retrieves specific data from the CRM. You can use JOINs in the FetchXML query, so that you read data from multiple entities. You can also apply filtering criteria to only retrieve data that meets the criteria, so you only work with the data you are interested in.Another big advantage of using the FetchXML option is that you can use FetchXML to query data from virtually any CRM entity. When the Entity option is used, the list of entities available is limited to those that are deemed to be readable according to CRM entity metadata returned by CRM metadata service.Since v5.2, we have enhanced the support of SSIS variables in FetchXML query, so you can now use SSIS variables in whichever way you would like to use, and you are not limited to use SSIS variables in conditions only.
- Since v1.1, we added the support for SSIS variables in FetchXML query. You can use the toolbar to add variables to your query in order to parameterize the query.
<fetchmapping="logical"><entityname="account"><attributename="accountid"/><attributename="accountnumber"/><attributename="name"/><attributename="owneridtype"/><link-entityname="systemuser"to="ownerid"from="systemuserid"alias="su"><attributename="isdisabled"/></link-entity></entity></fetch>- Source Type - EntityChanges (since v6.0)
- This option requires CRM 2015 Update 1 or later, the Change Tracking option needs to be enabled for the entity in Microsoft Dynamics CRM. This option includes two configurable Variables - Input Token Variable and Output Token Variable. There are also two outputs that come with this option - the CRM Primary Output and the CRM Secondary Output (Deleted records).
- Input Token Variable (Requires 'Change Tracking' feature in CRM 2015 Update 1 to be enabled)
- On the initial execution, the value of the variable set may be empty. For this feature to be effective, for any executions after the initial, a variable containing the token retrieved previously from the Output Token Variable should be set to the Input Token Variable.
- Output Token Variable (Requires 'Change Tracking' feature in CRM 2015 Update 1 to be enabled)
- The token returned by CRM may be written to a variable and stored for later use (ex. to manage incremental changes) by setting it to the Input Token Variable for the next execution.
- Source Type - AuditLogs (since v7.0)
- When you select AuditLogs option from the above Source Type option, you will be presented a text editor that allows you to enter a snippet of FetchXML query, which is used to retrieve audit data from the Microsoft Dynamics CRM server according to the query specified. For example, if you wanted to retrieve audits from the account entity, you would write your FetchXML query to return accountid field, which is the primary key of the account entity (Note that we only use the primary key when reading audit information - from best practice perspective, your query should only return the primary key). You may also include filtering conditions in your query as required.If you want to read all audit records, you can write your FetchXML Query to read from audit entity directly. Note that reading all audit records is not typically recommended, and it could take a very long time to complete if you have a large number of audit records.There are two outputs from the CRM Source Component when the AuditLogs option is selected. The Primary Output contains the entity-level audit information, while the Secondary Output contains the audit details, mainly field-level changes, including the field's old values and new values. The Primary Output has a one-to-many relationship to the Secondary Output, which you can join on the auditid field which exist in both outputs.
- Impersonate As (since v5.0)
- The Impersonate As option is an optional setting in CRM source component, which allows you to specify the CRM user to be impersonated when reading data from CRM server. This option should be rarely used and is designed for the scenario where impersonation is required when reading from certain entities. An example is CRM userquery entity.Note that the integration user must have the ActOnBehalfOf privilege or be a member of the PrivUserGroup group in Active Directory in order to use this option.
- Output Timezone (since v5.2)
- The Output Timezone option specifies how CRM datetime values are produced.There are three options available.
- UTC (Default)
- Adjust to timezone of Connection User
- Adjust to timezone of Impersonation User
Note that "Adjust to timezone of Impersonation User" option should only be used when Impersonate As option has been set. - Refresh CRM Metadata Button
- Since v2.0, we added a new feature to the CRM source component, which is a button called "Refresh CRM Metadata" on the CRM Source Editor window. By clicking this button, the component will retrieve the latest metadata from the CRM server and update each field. This feature works by performing the following three actions.
- Update any existing fields to the latest CRM metadata
- Add any new CRM fields that have recently been created in CRM system
- Remove any CRM fields that have recently been deleted from CRM system
After clicking this button, you will receive the following screen once the refresh is done.The Refresh CRM Metadata feature has been designed to minimize any rework after the refresh. Particularly, the component will only update any existing fields to the latest CRM metadata without actually deleting and re-creating them, which would otherwise cause rework if you have downstream pipeline component mapped to such fields.This button can be also useful if you want to change the source component's Connection Manager, or even Source Entity/FetchXMLoption without having to re-configure the component. In case you need to do so, you can first use the source component's Advanced Editor window to make the changes accordingly, then open the source component using its standard editor window, and click the "Refresh CRM Metadata" button, which should update the component properly.


Columns page
The Columns page of the CRM Source Component shows you all available columns from the Entity or FetchXML query that you have defined in the General page.
When the Source Type option has been chosen as Entity in the above General page, you will notice that the grid in Columns page has a checkbox column on the left which allows you to specify what fields you want to read from the chosen CRM entity.

On the top left of the grid, you can see a checkbox, which can be used to toggle the selection of all available CRM fields. This is a productive way to check or uncheck all available CRM fields.
NOTE: As a general best practice, you should only select the CRM fields that are needed for the downstream pipeline components. This would not only speed up CRM queries, but also save resources for the SSIS engine.
Use of CRM Destination Component
The CRM Destination Component is an SSIS data flow pipeline component that can be used to write data to a destination Microsoft Dynamics CRM server. You may create, update, delete, upsert (Update / Insert), convert, merge, or ExecuteWorkflow CRM records using the CRM Destination Component.
The CRM Destination Component includes the following three pages to configure how you want to write data to Microsoft Dynamics CRM server.
- General
- Columns
- Error Handling
The General page is used to specify general settings for the CRM destination component. The Columns page allows you to map the columns from upstream components to CRM fields in the destination entity. The Error Handling page allows you to specify how errors should be handled when they occur.
General page
The General page of the CRM Destination Component allows you to specify general settings for the component.

- CRM Connection Manager
- The CRM destination component requires a CRM connection in order to connect with the Microsoft Dynamics CRM server. The CRM Connection Manager option will show all DynamicsCRM connection managers that have been created in the current SSIS package.
- Action
- The Action option allows you to specify how data should be written to the Microsoft Dynamics CRM server. There are seven (7) action types available.
- Create - Create new record(s) in CRM
- Update - Update existing record(s) in CRM
- Delete - Delete record(s) from CRM
- Upsert - Update any existing record(s) in CRM if matching can be found, otherwise create a new record with the information from the upstream pipeline components.
- Convert (since v5.0) - Convert a CRM record. The following are the supported entities:
- Lead - Qualify a lead by converting it to CRM account, contact and opportunity records
- Opportunity - Convert an opportunity record to a quote
- Quote - Convert a quote to a salesorder
- Salesorder - Convert a salesorder to an invoice
- Team (only applicable to CRM 2013 or later) - Convert an owner team to an access team
- Merge (since v3.3) - Merge action takes two CRM records as its input and performs a CRM merge action on them by retaining one of them while retiring another one.
Merge action is only possible with the following CRM entities:- account
- contact
- lead
- targetid - the record that you would like to retain
- subordinateid - the record that is going to be retired, in which case, the record itself will be deactivated and
all child records will be re-parented underneath the retained record which is specified by the targetid input column
- ExecuteWorkflow (since v3.0) - Execute CRM workflow for the selected CRM record(s)
- Destination Entity
- The Destination Entity option allows you to specify which CRM entity to write data to. When an option is selected, the SSIS Integration Toolkit will retrieve a list of all available CRM entities from the selected CRM connection. Please note that the list will only include the entities where the specified user in the CRM connection manager has the proper write privileges.NOTE: You may select a N:M (many-to-many) CRM relationship entity as the Destination Entity, in which case you use theCreate action to create an association between two CRM records, and use the Delete to disassociate two records. When theUpsert action is used for a N:M relationship entity, the component will try to determine if an association already exists in the system. It will only create a new association if there is no existing relationship between the two CRM records.NOTE: You can see a CRM entity called accessteammember, this is not a real CRM entity. It is a virtual entity that helps facilitate adding / removing users to a CRM access team. You can only use this entity against CRM 2013 or later, since access team is a new feature introduced in CRM 2013. Further details about how to use entity are covered later in this document.
- Update Matching Criteria
- The Update Matching Criteria option allows you to specify how the Update action determines whether a record already exists in the destination CRM system. The component supports two Matching Criteria.
- Primary Key - The Primary Key option matches CRM records based on their GUID IDs of their primary keys.
- Alternate Key - The Alternate Key option allows you to uniquely identify a record aside from the primary key. This criteria relies on the alternate key setup in CRM.
- Upsert/Update Matching Criteria
- The Upsert/Update Matching Criteria option allows you to specify how the Upsert action determines whether a record already exists in the destination CRM system. In the case when Update action is used, this option is used to specify how to find the matched records in CRM system to perform an update. The component supports the following four matching options when the Upsert action is selected.
- Primary Key - The Primary Key option matches CRM records based on their GUID IDs of their primary keys.
- CRM Duplicate Detection - The CRM Duplicate Detection option matches CRM records based on the CRM duplicate detection rules that have been setup in CRM.
- Manually Specify - The Manually Specify option allows you to choose a combination of CRM fields to be used for the Upsert matching criteria in order to determine whether a matching record exists in the CRM system. When the Manually Specifyoption is selected, you will see checkboxes next to the CRM fields in the grid on the Columns page.
- Alternate Key - The Alternate Key option allows you to uniquely identify a record aside from the primary key. This criteria relies on the alternate key setup in CRM.
- Handling of Multiple Matches (since v3.0)
- It is possible that Upsert action could find multiple matches in the target CRM system when CRM Duplicate Detection or Manually Specified options are used. The Handling of Multiple Matches option allows you to specify what action will be taken when such multiple matches are found. There are four options available.
- Update All
This is the default behavior of the version prior to v3.0 - Update One
The component will only update the first matching record - Ignore
The source row will be ignored when multiple matches are found - Raise an error
An exception will be reported when multiple matches are found
- Update All
- Remove Unresolvable References
- The Remove Unresolvable References option specifies how to handle CRM lookup fields when the reference records are not available. When this option is checked, if a CRM lookup field refers to a CRM record that does not exist in the system, the CRM lookup field will be removed before the data is written to the CRM system.NOTE: We do not typically recommend using this option, since it will remain silent to any broken lookup references.NOTE: The Remove Unresolvable References option is not available when the Action is Delete.
- Enable CRM Duplicate Detection
- The Enable CRM Duplicate Detection option specifies whether CRM duplicate detection should be fired when writing data to Microsoft Dynamics CRM.NOTE: The Enable CRM Duplicate Detection option is not available when the Action is Delete.NOTE: In order for the CRM Duplicate Detection option to take effect, you must setup proper duplicate detection rules for the target CRM entity in your CRM system. You must also enable duplicate detection, which is a system-wide configuration setting available in Settings -> Data Management -> Duplicate Detection Settings.NOTE: There is a special behavior that you should be aware of if you want to use the Enable CRM Duplicate Detection option. CRM duplicate detection relies on a CRM Asynchronous service job called the Matchcode Update job, which is not a real-time job. For this reason, any records that have been recently (for example, the last couple of minutes) added or updated in the system, will not have matching code in the CRM system until the Matchcode Update job kicks in next time, which usually happens every few minutes. Therefore, the duplication detection would not take them into account. Due to the mentioned reason, we do not usually recommend relying on CRM duplicate detection on large data load processes. A better option would be using the Upsert action, and selecting a combination of manually-selected matching fields. This is a more reliable solution since it performs a real-time duplicate check during the data load.
- Ignore Null-Valued Fields (since v2.0)
- The Ignore Null-Valued Fields option allows you to ignore any fields that have a null value. By ignoring a field, the null value will not be posted to the CRM server. This can help avoid the situation that you overwrite non-empty values with an empty value, if your requirement dictates so.
- Ignore Unchanged Fields (since v2.0)
- The Ignore Unchanged Fields option allows you to ignore any fields that have not been changed in the target CRM system. This feature is useful when your CRM system has workflows or plugins to be fired when certain field value changes. With this option selected, the CRM destination component will check the target CRM system and compare each field to see if there are any changes for them. The component will only post the fields that have actual changes. All unchanged fields will be skipped and therefore, not posted to CRM. This component can prevent firing unnecessary CRM workflows or plugins.NOTE: "Ignore Unchanged Fields" option does not apply to CRM partylist (activityparty) fields due to the fact that partylist fields store complex values which are not always practical to compare. This does not have any negative impacts to your data integrity or anything in that regard, the only side effect is, all partylist fields will be posted to CRM server regardless whether there is a change or not.
- Change Flag Field(s) (since v7.0)
- The Change Flag Field(s) option can be enabled when the 'Ignore Unchanged Fields' option is selected. It is used in special cases to help track or tag where the last change of the record was initiated. For instance, if the source of your SSIS data flow is coming from your ERP system, you can have an input value for this field as "ERP" (or your actual ERP application name, such as "AX", "NAV"), we will only write to this field if there are any changes to other fields, when the 'Ignore Unchanged Fields' option is selected. You can use semi-colon (;) character as the delimiter to create a list of fields for this purpose.
- Remove Invalid Characters (since v7.0)
- When enabled, the Remove Invalid Characters option will remove any invalid characters from the input which can avoid an XML exception when the components tries to construct the SOAP request to be sent to CRM server. Those invalid characters are usually not accepted by CRM server even posted.
- Batch Size (since v3.0)
- The Batch Size option allows you to specify how many records you want to submit to the CRM server in a batch using the Bulk Data Load API provided by CRM 2011 Update Rollup 12 or later. This can significantly boost your data load performance, particularly if you are using CRM online.NOTE: With CRM 2011, you need to have Update Rollup 12 (UR12) installed in order to take advantage of CRM Bulk API support.NOTE: By default, CRM Bulk API supports a batch size of up to 1000. However the limit can be overridden by setting the ExecuteMultipleMaxBatchSize parameter (which is generally not recommended).NOTE: When using the Bulk API, you may want to consider increasing your CRM connection manager's timeout parameter to accommodate the extra time that is required to process the number of requests at server side.NOTE: When you use a Batch Size that is greater than 1 for a CRM Online instance, you want to be extra cautious about any potential parallel execution of SSIS data flow tasks that write to CRM server using bulk API simultaneously. There is a throttling setting on CRM Online server side, which prohibits more than 2 concurrent ExecuteMultipleRequest executions per CRM organization (ExecuteMultipleRequest is what we use behind the scene when a Batch Size is specified). In other words, you should not run more than two CRM destination components in parallel that write to CRM Online server simultaneously by using a Batch Size greater than 1. Practically, only a batch size of greater than 10 is actually governed by the throttling limit, based on our testing.NOTE: When using the Upsert action, it is possible that the component can find multiple matches if you are using CRM Duplicate Detection or Manually Specify as the matching criteria option. You will need to take this in consideration when setting the Batch Size.
- Send datetime values in UTC format (since v3.0)
- The Send datetime values in UTC format option indicates whether datetime values should be submitted to CRM server in UTC format. This option will apply to all datetime fields when selected.
- Execute Workflow Option (since v3.0)
- The Execute Workflow Option allows you to specify which CRM workflow you want to fire for the CRM records.NOTE: In order for a CRM workflow to be shown in the list, the workflow has to be activated (or published) with the "As an on-demand process" option selected in CRM.NOTE: Since v7.0, we added support for CRM custom actions using the ExecuteWorkflow option.
- Refresh CRM Metadata Button
- By clicking the "Refresh CRM Metadata" button, the component will retrieve the latest metadata from the CRM server and update each field. This feature works by performing the following three actions.
- Update any existing fields to the latest CRM metadata
- Add any new CRM fields that have recently been created in the CRM system
- Remove any CRM fields that have recently been deleted from the CRM system
After clicking this button, you will receive the following screen once the refresh is done.This button can be also useful if you want to change the destination component's Connection Manager, or even Destination Entityoption without having to lose all existing mappings. In case you need to make such changes, you can first use the destination component's Advanced Editor window to change its Connection Manager, and/or Destination Entity option accordingly, then re-open the destination component using its standard editor window, and click the "Refresh CRM Metadata" button, which should update the component properly. - Map Unmapped Fields Button (since v3.0)
- By clicking this button, the component will map any unmapped CRM fields by matching their names with the input columns from upstream components. This is useful when your source component has recently added more columns, in which case you can use this button to automatically establish the association between input columns and unmapped CRM fields.After clicking this button, you will receive the following message.
- Clear All Mappings Button (since v4.1)
- By clicking this button, the component will reset all your mappings in the destination component.


Columns page
The Columns page of the CRM Destination Component allows you to map the columns from upstream components to CRM fields for the destination entity.
In the Columns page, you would see a grid that contains six columns as shown below.

- Input Column - You can select an input column from an upstream component for the corresponding CRM field.
- Destination CRM Field - The CRM field that you are writing data.
- Text Lookup - This is a feature that we added since v2.0. This option is only available for CRM lookup fields. When this option is selected, the component can perform lookup based on a text value of the target entity. The text value is the value of the target entity's primary field. Depending on the software version that you are using, the component will have different behavior when duplicates are found in the lookup entity.
- In our v2.0 release, Text Lookup feature will report an error when the text values of the target entity have duplicates (the values have to be unique).
- Between v3.0 and v4.1 releases (inclusively), uniqueness is not a requirement. When duplicates are encountered, the component will use the last record returned by the query against the target entity.
- From v5.0 release, you can define how lookup duplicates are handled.
- Data Type - This column indicates the type of value for the current CRM field in CRM system. Typically, it is required to pass in the value using the format indicated in Data Type column, but there are three exceptions.
- When working with CRM lookup fields, if you are using the Text Lookup feature, you would pass in a text (string) value as the input although the field's Data Type is uniqueidentifier.
- CRM lookup type field (which usually ends with type or typecode such as owneridtype, objecttypecode, etc.) can take either integer values or a string values, although its Data Type is int, when SOAP 2011 service endpoint is used. When working with SOAP 2007 or 2006 service endpoint, you must pass in the entity's type code in integer format.
- CRM OptionSet (or picklist) field can also take either integer values or a string values, although its Data Type is int.
- Create - This column should only appear when the Upsert action is used. It indicates whether the field is applicable to a Create request for an Upsert action. When the field is not applicable to a Create request, the input value of this field will be ignored when we post the Create request to the CRM server.
- Update - This column should also only appear when the Upsert action is used. It indicates whether the field is applicable to an Update request for an Upsert action. When the field is not applicable to an Update request, the input value of this field will be ignored when we post the Update request to the CRM server.
- Unmap - This column can be used to unmap the field from the upstream input column, or otherwise it can be used to map the field to an upstream input column by matching its name if the field is not currently mapped.
When the Upsert action is selected in the General page, and the Upsert Matching Criteria option has been chosen as "Manually Specify", you will see a checkbox for each field listed in the grid. You may select one or more fields so their value(s) are used as matching criteria.

When the Upsert action is selected in the General page, you will see two more columns in the column mapping grid called Create andUpdate, they have a value of either Yes or No. What they indicate is whether the corresponding field is applicable to the specified action. When the field is not applicable to a particular action, the value for the field might be discarded before writing to the CRM. For instance, if the field is not applicable for Create, then the value will be ignored when the Upsert action tries to create a new CRM record. Likewise, if the field is not applicable for Update, the value will be ignored when the Upsert action tries to update existing CRM record(s). Note that this is a feature added in v1.1 SR1, so if you are using an earlier version of the toolkit, you may not see those two columns.
NOTE: To maximize the component's performance, it is not advised to select too many fields for the matching purpose.
NOTE: You should consider adding custom indexes to those manually specified matching fields that you have selected in CRM database to improve the performance for the matching query.
Working with Text Lookup Feature
Since v2.0, we added support for the Text Lookup feature, which allows you to perform lookup based on the text values of the target entity. To configure the Text Lookup feature, you click the ellipse button in Text Lookup column which is available in the CRM destination component's mapping page. You will be presented with the following screen.

There are three options that you can choose to define how the lookup is performed.
- Do not Use Text Lookup - This is the default option. When selected, you have to provide primary key values in GUID format as input for the lookup field.
- Use Primary Field (All) - Using this option, the lookup will be performed based on the primary field(s) of the target entity/entities. In other words, the input of the lookup field should be the text values of the primary field for the target entity/entities. From customization perspective, every CRM entity has a primary field. For instance, account entity's primary field is name, contact entity's primary field is fullname, and so on. So in the case when the lookup field is targeting account entity, you can provide a text value of "ABC Company" as the input, the component will perform a search by looking up "ABC Company" from the account entity and convert it into GUID as the input value for the lookup field.
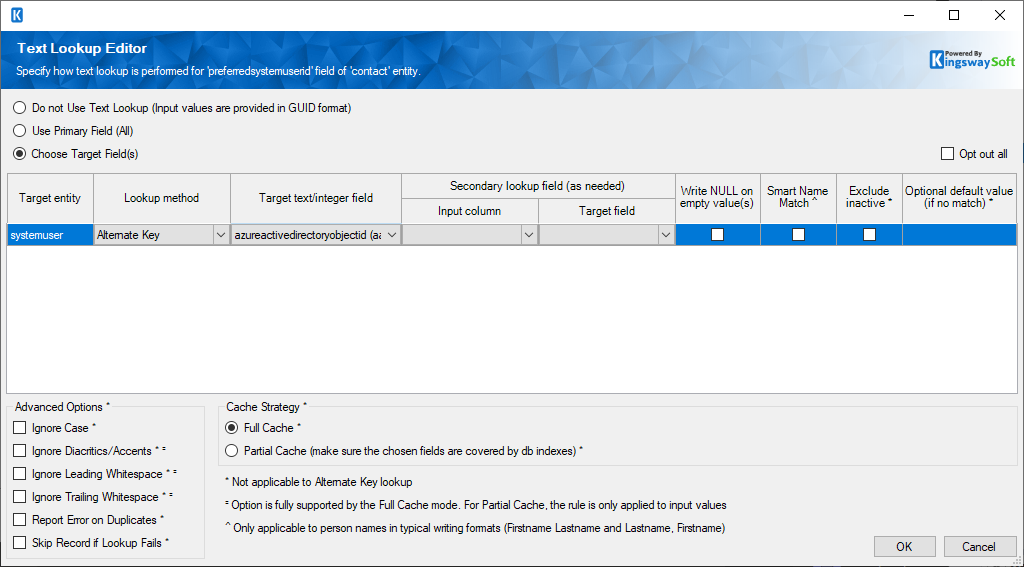
- Choose Target Field(s) - Using this option, you can specifically choose which text field should be used for the lookup purpose. When you choose this option, you will be presented with a list of the target entities for the lookup field, and you can choose to use different lookup strategy for each target entity. In this list you will be able to see the following options.
- Lookup method - there will be 4 options available (This option was introduced in v7.1, it used to be a different setup in previous releases - without the Alternate Key option)
- Primary Field - The lookup will be performed based on the target entity's primary field. When you choose this option, any value in "Target Text Field" will be cleared.
- Manually Specify - You can choose whichever text field to be used for lookup purpose. Note that this option is not available for partylist fields, as the only possible way to do Text Lookup for partylist field is the primary field.
- Alternate Key(since v7.1) - You can choose to perform lookup using CRM Alternate Key for the specific entity. This option provides the capabilities to look up on one or two fields as defined by the Alternate Key selected. In the case that the Alternate Key is defined by two CRM fields in the lookup entity, the input value passed to the lookup field will be used for the first field of Alternate Key setup, and you will need to specify an input for the secondary key field, as shown below. Note that Alternate Key is a feature introduced in CRM 2015 Update 1, which is not available to a previous CRM version.
- <Opt Out>(since v5.0) - When chosen, the component will not perform text lookup for this particular target entity. In this case, a GUID input (or an empty value) will be provided for the concerned lookup entity. This option is particularly useful for the migration of partylist fields. If that is the case, you may want to do Text Lookup for systemuser entity, but not the other entities such as account, contact, lead, in which case, you will be providing the GUID input for those lookup entities.
- Target text/integer field - This column allows you to specify which text/integer field will be used for the lookup purpose from the lookup entity. In the case the lookup method is chosen as Alternate Key, this is where you choose the Alternate Key that's defined in CRM.
- Exclude inactive - When chosen, the component will exclude any inactive records from being used for the lookup purpose.
- Optional default value (if no match) (since v5.2) - When specified, the component will use this default value to perform the lookup should the input value lookup fail. This can be useful in some special scenario, for instance, if you try to migrate the account entity with ownerid field being set up to use text lookup feature, and you however don't plan to migrate all systemuser records to the new CRM system (either those users have left the organization or they are no longer using CRM system). For those migrated users, the text lookup works fine. For those users that were not migrated, the text lookup feature will fail, in which case you can set a default value here (the user's fullname) so the component will default to the user specified, by assigning all such records to the specified default user.
Note that when the input value for the lookup field is empty (or NULL), text lookup will not be performed. Therefore, the optional default value will not be used in case that the input value is empty.
- Lookup method - there will be 4 options available (This option was introduced in v7.1, it used to be a different setup in previous releases - without the Alternate Key option)
In addition to the above options, Text Lookup feature also offers the following three advanced options since our v5.0 release.
- Ignore case (since v5.0) - When chosen, the Text Lookup will perform a case-insensitive lookup. For instance, "ABC Company" will be treated the same as "abc company".
- Report error on duplicates (since v5.0) - When chosen, the Text Lookup feature will report an error when a duplicate is encountered at the time the lookup cache is populated.
- Cache Strategy (since v5.0) - You can choose from one of the two options:
- Full Cache - When chosen, the component will populate a full cache of all records from the lookup entity before starting to write to target CRM system. This is the preferred option when the number of records in lookup entity is small. This option is the default mode when v4.1 or an earlier version is used.
- Partial Cache - When chosen, the component will gradually build up lookup cache as the data load progresses. This is the preferred option when the number of records in lookup entity is significantly large. For instance, if you have more than a few hundreds of thousands of records in lookup entity, and you are only processing a few hundreds of records for your primary entity, Partial Cache mode would provide better performance.
Working with principleobjectaccess Entity
Since v2.0, we added support of writing data to principalobjectaccess (POA) entity. To write to principalobjectaccess entity, you can use the following three actions.
- Create, which will be a GrantAccess message that shares the CRM record with the intended team or system user
- Update, which will be a ModifyAccess message that modifies the sharing of the concerned CRM record
- Delete, which will be a RevokeAccess message that un-shares the CRM record with the intended team or system user

When writing data to POA entity, you need to provide the following values:
- accessrightsmask - Access Rights Mask can be an integer value added up by any combination of the following numbers.
Read = 1
Write = 2
Append = 4
AppendTo = 16
Create = 32
Delete = 65536
Share = 262144
Assign = 524288
accessrightsmask is not needed for Delete (RevokeAccess) action, therefore the field is not available for Delete action. - objectid - The CRM record's ID that you want to share or un-share.
- objecttypecode - The CRM record's typecode. If SOAP2011 endpoint is used, you can use entity's name.
- principleid - ID of the systemuser or team that you would like to share or unshare the CRM record with.
- principletypecode - Typecode of above the principleid. It should be either 8 (systemuser) or 9 (team). If SOAP2011 endpoint is used, you can use entity's name, which would be either systemuser or team.
Working with accessteammember Entity (since v4.1)
Since v4.1, we added support of CRM Access Team feature, which was introduced in CRM 2013. To provide this capability, we designed a virtual CRM entity called accessteammember, which allows the following two actions in CRM destination component.
- Create, add a user to a CRM record's access team
- Delete, delete a user from a CRM record's access team
After you have selected accessteammember entity, you would need to provide an input for the following 4 fields.
- recordid: the CRM record's ID (in GUID) that you try to add (or remove) user to (or from) its access team
- recordidtype: the record's entity name
- systemuserid: the CRM user you are trying to add (or remove) to (or from) the access team
- teamtemplateid: the access team template's primary key
NOTE: accessteammember is not a real CRM entity, it is not supported by CRM 2011 or earlier.
Error Handling page
The Error Handling page allows you to specify how errors should be handled when they happen.

There are three options available that you can choose for the component's error handling.
- Fail on error
- Redirect rows to error output
- Ignore error
When Redirect rows to error output option is selected, the error handling behavior might be different depending on the version of our software you are using.
- If you are using v5.0 or a later version, it will only redirect the rows that have failed to the error output (the successful ones will be directed to the Default Output of the destination component which is a new output in v5.0).
- If you are using v4.1 or an earlier version, it will redirect all rows to the error output including those that have succeeded and those that have failed. In case you need to further process CRM records after the destination component (such as logging CRM records to a different system, or writing to a different CRM entity using a subset of available fields) when using v4.1 or an earlier version, you must choose the "Redirect rows to error output" as the Error Handling option. Then attach a Conditional Split component to the CRM destination component. In the Conditional Split component, evaluate the ErrorCode column (an output field added by the CRM destination component) and check to see whether it has actually erred out. The Conditional Split should typically have two output branches, one is ErrorCode == -1, which is the success path, and the other one is ErrorCode != -1, which is the failure path indicating that an error has occurred when writing to the CRM.
In the error output, you can see the following columns:
- ID (version 4.1 or earlier) - Contains the newly created CRM record's ID, which you can use to write to log or further process using additional data flow components. Note that this column has been moved to the Default Output of the destination component in v5.0 which has a new name called CrmRecordId.
- ErrorCode - Contains the error code that is reported by CRM server or the component itself
- ErrorColumn - Contains the name of the column that is causing the error. Note that this column is not always populated
- CrmErrorMessage - Contains the error message that is reported by CRM server or the component itself
NOTE: Use extra caution when selecting the Ignore error option, since the component will remain silent for any errors that have occurred.
In the Error Handling page, there is also an option (since v5.2) that can be used to enable or disable the following output fields for the destination component.
- CrmRecordId - Contains the newly created CRM record's ID, which you can use to write to log or further process using additional data flow components.
- IsNew - Contains value to indicate whether it is a newly created CRM record, or an existing one. This is useful when you use Upsert action.
NOTE: If you don't plan to use any of those fields for any further processing, it is generally recommended to turn them off, so you don't get any warning from SSIS by complaining that those fields are never used, and it should also provide a slightly better performance by doing so. Note again this feature is only available since v5.2.
Use of CRM OptionSet Mapping Component
The CRM OptionSet Mapping Component is an asynchronous SSIS data flow pipeline component offered since v3.0 that can be used to manage the translation and mapping of CRM OptionSet values.
The CRM OptionSet Mapping Component includes the following two pages to configure how you want to perform the translation and mapping for CRM OptionSet values.
- General
- Mapping
The General page is used to specify general settings for the CRM optionset mapping component. The Mapping page allows you to create mappings of the optionset values, where you can also specify how you want to handle non-matched values.
General page
The General page of the CRM OptionSet Component allows you to specify the general settings of the component.

- Input Column
- The Input Column is the source system column that you receive data from, which you want to translate the text values to CRM OptionSet values. Note that you will get the translated OptionSet values from this column in the output of the current OptionSet Mapping component, which you can use as the input of the same OptionSet/Picklist field in your CRM destination component that you attach right after the current OptionSet Mapping component (OptionSet/Picklist field of our CRM destination component can take either string values or internal values).
- CRM Connection Manager
- The CRM OptionSet Mapping component requires a CRM connection in order to retrieve OptionSet metadata from the CRM server. The CRM Connection Manager option will show all DynamicsCRM connection managers that have been created in the current SSIS package.
- CRM Entity
- The CRM Entity option is used to specify the CRM entity that contains the OptionSet field which you need to work with.
- OptionSet/Picklist Field
- The OptionSet Picklist Field option allows you to specify which CRM OptionSet field you need to work with (OptionSet used to be called Picklist prior to CRM 2011) for the mapping.
Mapping page
In the Mapping page, you can specify how you map input values to the OptionSet values in the CRM system.

The top part of this window contains a grid which can be used to enter mapping values through four toolbar buttons. The first two buttons allow you to add or delete a mapping entry. The Import button allows you to import from a mapping that you previously saved or exported. The Export button allows you to export all mapping values in the grid to a .xml file so that edits can be made using a different tool that you feel more comfortable with.
The second part of the window is where you specify how to handle non-matched values. There are five options available.
- Create option
- When no match is found for a particular input value, this option allows you to create a new option using the input value for the specified CRM OptionSet/Picklist field.When this option is chosen, you will be presented with the following two more options:
- Internal integer value field (since v5.0) - Specify the input column which contains the internal integer value when creating the option.
- Input column for statecode - This option is only available when the target OptionSet/Picklist field is statuscode, which allows you to specify the input value of statecode in order to create the statuscode option.
- Replace as an existing option
- When this option is used, you must specify the option value to be used if no match is found.
- Set as empty
- This option will set the output value of the column to empty if no match is found.
- Leave it as is
- This option allows you to pass through the input value without making any change when no match is found.
- Raise an error
- This option allows you to throw an exception which fails the component entirely when no match is found for a particular input value.
License Manager
The SSIS Integration Toolkit comes with a license manager program which helps you manage and activate the product license key to be used for the toolkit.
Without a commercial license, SSIS Integration Toolkit will operate under the Developer License which is free to use for development or evaluation purposes. Under the developer license, you can use the software within the development tool (SSDT-BI, BIDS, or Visual Studio).

The only limitation with the free developer license is the inability to run the software outside of the development tool (SSDT-BI, BIDS, or Visual Studio). If you would like to run the software outside the development tool, such as running SSIS packages on a scheduled basis or from a command line, you will need to acquire a license from us.
If you want to test out the functionality by scheduling your SSIS packages, a trial license can be requested. To do so, you can launch License Manager program, then click "Change License Key" button, where you can request for a free trial license after filling out the necessary Licensee Information.

If you have received a product license key from us after placing an order through our online shopping cart system, you can also click "Change License Key" button. This allows you to enter the product license key to activate the software and use the fully-featured commercial license.
To request a free trial license or activate a product license key that you have received, use the Web Service option to complete the process by sending the request to our license server directly. An Internet connection is required when the Web Service option is used. This is the option that we recommend.
Alternatively, you can choose the Email option. The license manager will generate an email which you can send to us. The Email option should only be used if your system has no Internet access. It requires manual processing so please expect to wait 24 to 48 hours before receiving a license file from us. Once you have received the license file from us through email, you can save it to a local file, which you can then install by clicking "Install License File..." button in License Manager.
If you have acquired a perpetual license from us, once the software has been activated, your license manager will look something like below.

Since v2.0, you can see your Support Expiry Date or Maintenance Expiry Date in the License Manager program if you are using a perpetual license. By default, your perpetual license comes with one-year maintenance and upgrade, which entitles you to use any version of the software released before your Support Expiry Date or Maintenance Expiry Date. You can extend your support expiry date by entering a new maintenance license key that you have acquired from us.

If your commercial license is a subscription license, you will not see the Support Expiry Date or Maintenance Expiry Date option in the License Manager program, since your subscription license comes with maintenance and upgrade for the entire subscription period.
NOTE: Starting from v2.0, you must run License Manager program under a local administrative account due to the privileges required to write license file to the system.
Advanced Topics
For some advanced integration topics that are not covered in this manual page, you should check out our online FAQ page which covers some specific integration scenarios, including:
- Frequently asked licensing questions
- Best practices and performance tuning
- How to work with CRM partylist fields
- Some frequently encountered errors
- and more...
Known Limitations
The following are some limitations of the software which are either by-design or due to the constraints of Microsoft Dynamics CRM or SSIS platform:
- In the CRM Source Component, with the FetchXML option, if you are using linked entities in your FetchXML queries, the CRM component returns NULL values for the fields from linked entities. To avoid this, provide an alias for each linked entity.
- When reading from virtual fields, like lookup name fields or OptionSet name fields, make sure to also include the base field (ex. the lookup field or OptionSet field) in the CRM Source Component.
- The Destination Component will not report the CrmRecordId (guid) or IsNew Columns for N:N relationships.
- When creating records using the Upsert action and a Batch Size of greater than 1, there may be a case where duplicate records are created in CRM - if there are duplicate records within the same batch. There are two ways this issue can be handled:
- Set the Batch Size to 1.
- Eliminate duplicates from the source in the same batch before passing in to the CRM Destination Component.
- Our software does not support multi-factor authentication (MFA), as our software is primarily designed for non-interactive use, and multi-factor authentication usually involves human intervention, which is not possible for unattended SSIS job processes.