Sunday, 4 September 2016

Steps to integrate Dynamics CRM Online and Power BI

As we know, POWER BI is very robust application, which helps to analyze Business Data. It can be a powerful visualization tool for Dynamics CRM users for analyzing their Business. Hence, Microsoft has introduced integration of POWER BI with MSCRM from this 2016 release.
Here are the steps to integrate POWER BI with MSCRM:
There are three Microsoft Dynamics CRM content packs for Power BI. Using this content pack user can analyze Sales, Service, and Marketing data.
1) Microsoft Dynamics CRM Online Sales Manager.
2) Microsoft Dynamics CRM Online Service Manager.
3) Microsoft Dynamics Marketing.
In this blog, we will see how to use Microsoft Dynamics CRM Online Sales Manager content pack of Power BI for connecting with MS CRM.
Steps using Power BI Web:
1) Register with Microsoft Power BI.
2) Once you Sign in with Power BI, click on Get Data button which is present on left bottom.
3) To select the “Microsoft Dynamics CRM Online Sales Manager” content pack, click on GET button inside Services tab.Power BI Web
4) Now select the “Microsoft Dynamics CRM Online Sales Manager” content pack.Dynamics CRM Online Sales Manager
5) Provide your MS CRM organization URL and fiscal year end month number and click on next button.MS CRM organization
6) Then select the Authentication method as OAuth2 and click on Sign in button.CRM & power BI
7) Provide your MS CRM Credentials.MS CRM Credentials
8) After Successful Sign in process, you can see the Dashboard.Power BI Desktop
 Here you can see the Reports.reports
Steps using Power BI Desktop:
Download the Power BI Desktop application and install it.
1. Launch the Power BI Desktop application and sign in with Power BI Credentials.
2. Click on Get Data button from menu bar and select the “Dynamic CRM Online” service. Then click on Connect button.
Power BI Desktop3. Now copy the MS CRM OData Service and click on Ok.
You will get this URL from MS CRM.
To get this URL from MS CRM navigate to Setting-> Customization-> Developer ResourcesDeveloper Resources4. Now select Organizational account tab and click on Sign in button. Then provide the MS CRM Credentials.
After signing in with MS CRM credentials click on Connect button as shown in below screen.Connect button5. Select any data set from open window and click on Load button.
In screen shot below, we selected opportunities set.
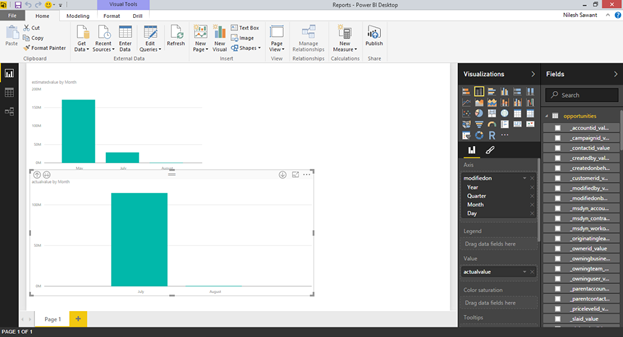
Using this data set we can create dashboards or reports in Power BI desktop.create dashboards6. Here you can create reports or dashboards using MS CRM Data
create reports or dashboards
Note: To use Power BI feature user will need subscription of Power BI.
Conclusion:
Power BI being a compelling data visualization tool, Dynamics CRM Online integration with Power BI is a noteworthy step taken by Microsoft. This blog gives a stepwise guideline required for connecting Power BI web and Power BI Desktop to Microsoft Dynamics CRM Online.

Wednesday, 31 August 2016

Roll-Up Field Enhancement for Related Activities in Dynamics CRM 2016

We all know about Microsoft Dynamics CRM Roll-up fields. Utilizing these Roll-up fields, we can previously create Date field in Contact entity and populate latest activity date or first activity date. But there was a limit to it and we could only find the activities which are related to the Contact via regarding field.
Now a new feature was introduced in Microsoft Dynamics CRM 2016 allowing us to find activities related to the other entities with all activity party records. So we can now include all activities where the source entity (ex. Lead) is entered in CC Recipient, To Recipient, Bcc Recipient, Optional Attendee, etc.
Let’s explore this with an example.
Create one Date field to your source entity. I have taken here Lead as my source entity and then select field type as “Rollup”. Then click on “Edit” button.Rollup field Dynamics CRM
After clicking on “Edit” button. We can see our Source Entity Name (Lead) and select Activities (Regarding) then select your filter criteria as per the activities you want to filter for.Roll-Up field Enhancement
Once we do this, we can see the new option “INCLUDE INDIRECTLY RELATED ACTIVITIES”. We have to select Activity Parties (Activity) for Activities Related via Entity. Then we can see another filter option in which we can set our “Participation Type” we want to include under this filter.Participation Type
Finally we have to set the Aggregation function to show the date in our field.Aggregation function
Once this whole process is completed, we can see the Latest activity date of all activities filtered by our filter criteria and for whom the Lead is in its Regarding, To Recipient, Cc Recipient or in Optional Attendee field.

Friday, 26 August 2016

CRM 2016 Conditional values in Word templates

Word templates introduced in CRM Online and CRM 2016 are not the easiest contraptions to edit. One of the questions that popped up in a recent conversation was how to use conditional IF in the document generation.

To refer to the control values after the document has been generated, wrap content controls using bookmarks defined at the control container level.

Longer

CRM fields are defined as Content Controls and in theory we could have written some simple VBA using ContentControl object. Except that CRM does not play nice when generating the document and simply replaces all content controls with the record values.
The solution is to wrap the content controls using the bookmarks defined at the container level, i.e. cell, row, paragraph, etc. Then this bookmark can be used as a reference in a conditional expression of the IF field.
For example, to insert conditional text depending on the total invoice value:
Insert bookmark
  1. Extract the Invoice template that comes with the sample data and save it under a different name.
  2. Open the template, find total amount, select the entire table cell and clickInsert > Bookmark.
  3. Type totalbookmark as a bookmark name, click Add.
  4. Delete the words “Thank you for your business” and click Insert > Quick Part > Field.
  5. Select IF field and type the following field code:
    IF totalbookmark > 100 “Thank you for you business!” “Thanks for nothing!”
  6. Click OK. Hint: to see and edit field codes in the document, press Alt-F9.
  7. Save the file and upload to CRM as a new template.
  8. Create an invoice and generate the invoice document.
  9. Enable document for editing, press Ctrl-A to select the entire content and press F9 to refresh the field content
  10. Depending on the total value of the invoice, the document will say “Thank you for your business!” or “Thanks for nothing!”
    Conditional values in the template
It’s not a full automation that potentially could be improved with some VBA (I’m not 100% sure if it will work) but it’s a step in the right direction and a cheap way to add some pizazz to your documents.